How to Replace Yours
I try to walk around the bus a lot and just listen when it's quiet. It's only a matter of time until you hear the familiar hissing of air. This time I tracked it down to the ride height valve located just forward, (in a tough to reach spot) of the drive wheels. The XL1 has three, one on each side in the back and one only in the front. They work when you're in ROAD mode and the valve is connected by a stem off the arm down to a part of the frame. As the bus pitches up and down the road the stem moves the arm up and down adding or deleting air to the bag(s) as needed. It's designed to maintain vehicle ride height as loads increase and decrease.
There is a slight delay in the activation. It does not respond to short duration changes in axle position. I understand that the new Prevosts have changed this with a quicker response valve that will activate air to the bags as you lean into a turn. Another good reason to buy a new bus. ;)
Tools and Parts Needed
Ride Height Valve from Prevost Part # 630085 • $59 • 800 621-5519
11mm wrench
11mm - 1/4 drive long neck socket
Small ratchet 3/8" drive
3/8" to 1/4" adapter
3" extension
Threadlocker
Wrenches to remove exitsting airlines (5/8")
2 - Bottle Jacks
Getting Started
Read all the directions and safety precautions from Haldex before starting.
You can do this job (Rear Valve Only, I have no idea where the one that contols the two front ones is located) without getting under the bus. However I still placed bottle jacks and backup blocks under the lift points as you'll be deleting air from the bag you're working on.


I'm sure there's an official Prevo way of doing this, but this was my method. Engine running and in ROAD mode. On level ground I measured from the pavement to the seam on the rubber. You'll need to know this measurement to make sure when the new Road Height Valve is installed it is calibrated correctly.


The side light is in the perfect spot for valve access. I'm not sure if this was designed by Prevost engineers for this purpose, but it certainly solves the problem of getting at this valve. Unless you're in Jon's Pit, I'm not sure if you could reach it otherwise.
Remove the light fixture. Here's How.

The key to any job is the right tool. After two trips to Sears I finally found the right combination to get at the two bolts and nuts needed to remove the valve.
I used a short 3/8" rachet to a 3" extension, connected to a 3/8" to 1/4" reducer and finally to 1/4" drive 11mm, deep socket.
I initially sprayed the valve with degreaser before starting and after sitting for a few minutes, hosed off the grease to make finding all the fittings and bolts easier.
There's very little room to work in this space, especially after you get your hands thru the light opening. So the right size tool is pretty imperitave to success.
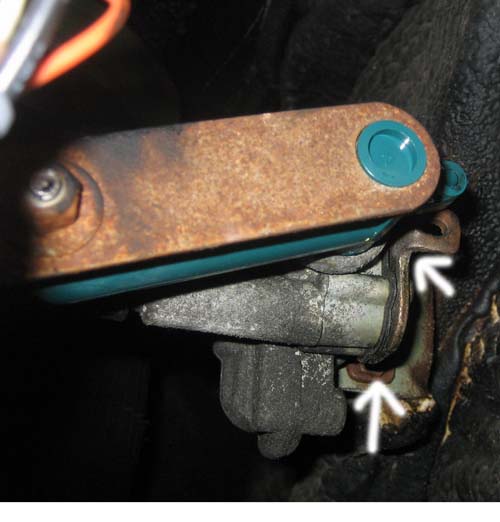
The white arrows are the location of the two bolts. There are nuts located behind that bracket so you'll need an 11mm wrench on the back side to keep it from turning.
Remove the bolt that holds the "Stem" to the arm on the Valve.
I removed the valve from the bracket first then removed the air lines. If you can get the wrenches to the air lines first for removal then it's better to wait to remove the bracket.
There are three ports on the Ride Height Valve. Before you remove the air lines from the valve, mark them with tape and note their location on the valve. On my bus both lines were identical.
• EXHAUST (just a 5" piece of hose)
• OUT to Air Bag
• IN from Air Supply
Note: On my set of directions the hookup for EXAUST and the IN supply was reversed from the actual hookup. I just duplicated the way it was installed on the bus and ignored the directions. THE EXHAUST HAS TO BE ON TOP.